 Türkçe
|
Türkçe
|
 English
Mastering Google Maps for Travel
Traveling is not just about the destination—it’s also about navigating the journey. Google Maps is one of the most powerful tools available to modern travelers, offering more than just directions.
Yet, only a small percentage of users truly unlock Google Maps’ full potential. Hidden within the app are countless features and tools that can significantly enhance your travel experience, whether you’re a meticulous planner or an adventurous wanderer. This guide will change your Google Maps game, teaching you how to make the most of these features.
1. Traveling with Heavy Luggage? Here’s How to Make Your Journey Effortless with Google Maps
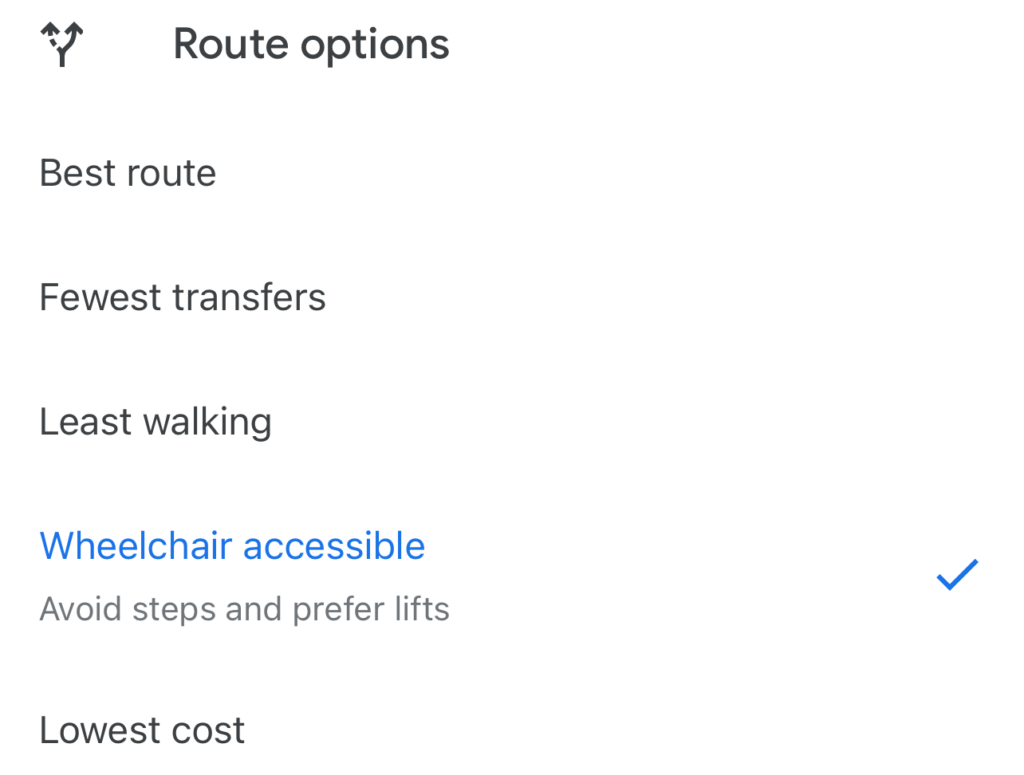
Option 1: Wheelchair-Accessible Routes ♿🛤️
This feature ensures your journey avoids stairs, escalators, and other obstacles — perfect for travelers carrying heavy bags or equipment.
- 📍 Enter Your Destination: Open Google Maps and type in where you’re headed.
- 🚌 Tap “Directions” and Choose Public Transport: Select the bus or train icon.
- ⚙️ Enable Wheelchair Access:
- Tap the menu (three dots in the top-right corner).
- Choose Route Options and check the box for Wheelchair Accessible.
- 🛤️ View the Route: Google Maps will highlight paths with ramps, elevators, or ground-level access.
Option 2: Least Walking Routes 🚶♂️🗺️
When you’re tired or simply want to minimize effort while carrying heavy bags, the Least Walking option helps prioritize routes with shorter walking distances.
- 📍 Enter Your Destination: Start by searching for your travel destination in Google Maps.
- 🚌 Tap “Directions” and Choose Public Transport: Select the bus or train icon again.
- ⚙️ Adjust Your Route Settings:
- Tap the menu (three dots in the top-right corner).
- Under Route Options, select Minimize Walking.
- 🛤️ Follow the Suggested Route: Google Maps will highlight options with minimal walking between stations and stops.

2. See Your Journey Before It Begins with Immersive View
Immersive View is more than just a planning tool — it’s like a secret weapon. 🛡️ It has saved me from countless surprises, like realizing a path wasn’t as accessible as I’d hoped or discovering a better route that I wouldn’t have noticed on a regular map. It’s especially helpful when you’re traveling with luggage or when walking long distances isn’t ideal.
Another excellent function is the ability to view simulations of weather and traffic conditions directly on your route. ☀️🚗 While it may not always provide real-time data, the broadcast simulations are impressively accurate and help you anticipate conditions at different times of the day. This has made my travel planning so much smoother, allowing me to adjust plans and make the most of every journey.
- 📍 Enter Your Destination: Whether it’s a restaurant, museum, or city center, start by searching for your destination on Google Maps. If you’re planning a route, enter both the starting point and the endpoint.
- 🧩 Activate Immersive View: Once your destination or route appears, look for the cube icon (inside the pink rectangle in the image). Clicking on this icon enables Immersive View, giving you a photorealistic 3D view of your destination or route.
- 🏙️ Explore the Area in 3D: Use this feature to “travel” your route in advance. It helps you spot landmarks, tricky intersections, and nearby places you might want to visit — and it can save you from many surprises like inaccessible paths!
- ⏳ Use the Slider for Simulations: Immersive View lets you slide through a timeline to preview weather and traffic conditions at different times of the day. It’s especially useful for planning the best time to start your journey and preparing for potential challenges.
It’s important to note that Immersive View is not yet available everywhere. Google recently announced in 2023 plans to roll it out for 50 cities globally, but currently, you can explore it in major destinations like London, New York, Paris, Tokyo, and Berlin. As Google expands this feature, it will become even more indispensable for travelers around the world.


3. Live View: The Game-Changer for Getting Around
If you’ve ever stepped out of a busy train station and had no idea which way to go, you’re going to love Live View. 📱✨ It’s one of those features I didn’t realize I needed until I tried it — and now, I can’t imagine traveling without it!
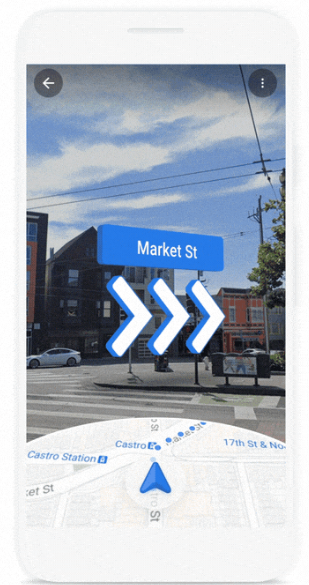
Live View uses your phone’s camera to overlay arrows, street names, and directions onto the real world around you. Instead of staring at a flat map and guessing which way is north, you simply follow the arrows — as if someone is walking right in front of you, guiding the way. 🧭 It’s especially helpful in crowded cities or winding streets, where traditional maps can be confusing.
For me, it’s not just about finding the right path — it’s about traveling with confidence. No more second-guessing, no more frustration, and definitely no more wasting precious time trying to figure out where to go! 🚶♂️🌍
- 📍 Search for Your Destination: Open Google Maps and enter where you’re heading. Choose the walking directions option to see available routes.
- 🧩 Activate Live View: You’ll see a Live View button at the bottom of the screen (it looks like a small figure holding a phone). Tap it to open your phone’s camera.
- 📸 Point Your Camera: Hold your phone up and point the camera at your surroundings. Google Maps will use landmarks and buildings to figure out exactly where you are.
- ➡️ Follow the Arrows: Once your location is detected, Live View will overlay arrows, directions, and street names right onto the real world. Just follow what you see on the screen — it’s that simple!


Live View has saved me countless times. 🧭✨ Whether I’m navigating a maze-like street market, finding my way to a tucked-away restaurant, or just trying to get back to my hotel after a long day — it completely takes the stress out of getting around.
What I love most is how easy it makes exploring new places. No more wandering in circles, no more asking strangers for directions — just clear, intuitive guidance every step of the way. 🚶♂️ If you haven’t used Live View yet, trust me, you’re missing out. Give it a try on your next trip — you’ll thank me later! 🌍✈️
4. Inside View: Using Google Maps for Indoor Navigation
Most people turn to Google Maps for outdoor navigation, but its hidden indoor features are absolute game-changers. 🏢✨ Whether you’re trying to find a restaurant in a massive shopping mall, locate your departure gate at a busy airport, or use augmented reality to guide you step by step, Google Maps takes the stress out of navigating large indoor spaces.
From malls to stadiums, train stations to airports, Google Maps makes it just as easy to find your way inside as it does outside.
Here are three incredible features I personally use:
- 🧩 Live View Indoors: Augmented reality arrows guide you to your destination seamlessly.
- 📚 Directory Access: Instantly browse what’s inside a building with just a tap.
- 🗺️ Floor Maps: Explore detailed floor layouts to pinpoint exactly where you need to go.
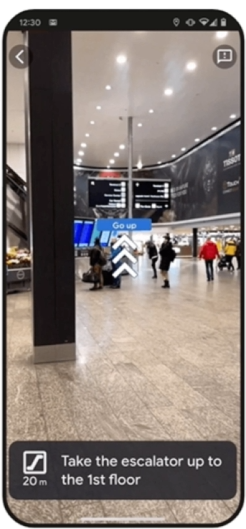
Live View for Indoors
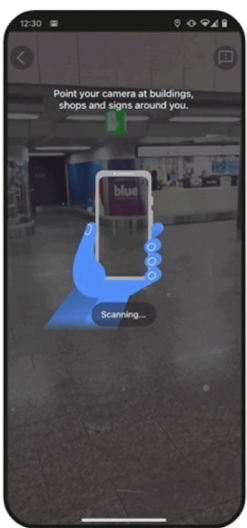
Google Maps’ Live View isn’t just for the streets — it’s also your best friend inside airports, malls, and train stations! 🏢📱 With visual arrows guiding your every step, you’ll never have to wander aimlessly looking for a gate or a store again. Currently available in thousands of locations worldwide, including cities like Tokyo, Berlin, and Sydney, this feature makes indoor navigation intuitive and stress-free. ✈️🏬
How to Use Live View Indoors 🧭🏢
- 📍 Enter Your Destination: Open Google Maps and search for your destination inside the building — whether it’s a gate in an airport or a store in a mall.
- 📸 Activate Live View: Once you’re at the location, lift your phone, and Maps will use your camera to scan the environment.
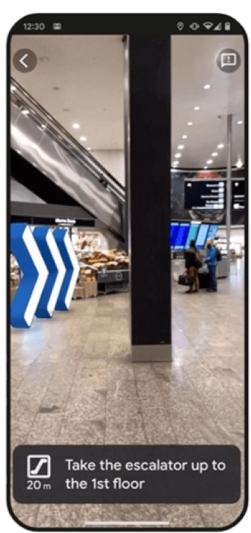
- ➡️ Follow the Arrows: Augmented reality arrows and markers will appear on your screen, guiding you step-by-step to your destination.
- 🔍 Check Extra Details: Along the way, you might also spot additional markers for nearby restrooms, lounges, or restaurants.
Directory Access
Imagine walking into a massive mall or airport and needing to find a specific restaurant, store, or restroom. 🏬✈️ Instead of wandering aimlessly, Google Maps’ Directory Access gives you a clear snapshot of everything a building has to offer. This feature is available in over 10,000 locations worldwide, ensuring you’ll always know where to go next! 📍
How to Use Directory Access 🧩🏢
- 📍 Search for the Building: Open Google Maps and search for the building you’re visiting, such as “John F. Kennedy International Airport” or your favorite mall.
- 🗂️ Tap on “Directory”: Once the building’s page loads, you’ll see a “Directory” button near the bottom of the screen. Tap it to access the full list of what’s inside.
- 🛍️ Browse Categories: The directory is organized into categories like restaurants, shopping, restrooms, and more. Select a category to explore specific places within the building.
- 🔎 Get More Details: Click on any listing to see extra info like opening hours, reviews, menus, and even directions to get there.
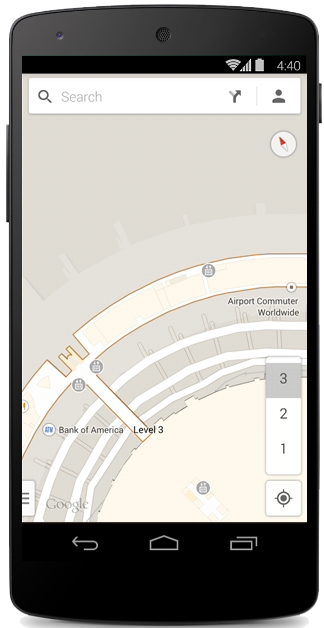
Floor Maps
Navigating large, multi-level buildings like airports, malls, or stadiums can be overwhelming. 🏢✈️🏟️ That’s where Google Maps’ Floor Maps feature comes to the rescue! With detailed layouts for each floor, this tool helps you find exactly what you’re looking for without getting lost — whether it’s the check-in counter at an airport, the food court in a shopping mall, or your seat at a stadium.
How to Use Floor Maps 🗺️🏢
- 📍 Search for the Building: Open Google Maps and enter the name of the building, such as “San Francisco International Airport” or “Mall of Berlin.”
- 🔍 Zoom In: Pinch and zoom in on the map until you start seeing detailed floor layouts.
- 🏢 Select a Floor: On the right-hand side, you’ll find a floor selection tool (e.g., “Floor 1,” “Floor 2”). Tap the floor you want to explore.
- 🛍️ Explore: Browse through stores, gates, lounges, or any other features. You can even tap a specific point on the map for more details like operating hours or reviews.

5. Offline Maps: Navigate Without an Internet Connection
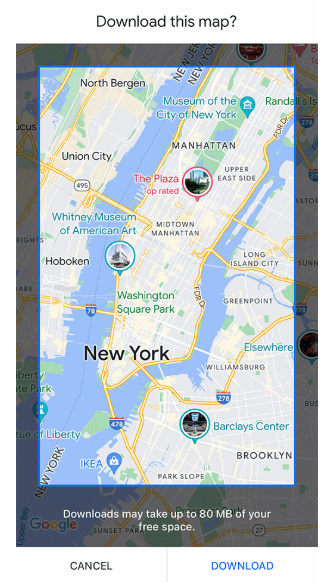
When traveling, there are often times when internet access is unreliable or nonexistent. 🌍🚫 That’s where Offline Maps in Google Maps becomes an invaluable tool! It lets you download maps of your destination, ensuring you can access directions, landmarks, and essential navigation even when you’re offline. 📱🗺️
Option 1: Select Your Own Map 🗺️⬇️
- 📱 Open the Google Maps app.
- 👤 Tap your profile picture in the top-right corner.
- 📡 Tap “Offline Maps.”
- 🗺️ Tap “Select Your Own Map.”
- 📏 Adjust the rectangle over the area you want to save.
- ⬇️ Tap “Download.”
Option 2: Download for a Specific Destination 📍⬇️
- 🔎 Search for the name of your destination (e.g., “Los Angeles”) in Google Maps.
- ☰ Open the location’s menu by tapping the three dots in the top-right corner of the screen.
- ⬇️ Select “Download Map for Offline Use.”
- 🗺️ Adjust the area if necessary, then tap “Save.”


Some Other Tips for Making the Most of Offline Maps 💡🗺️
- 💾 File Size Management: Before downloading, Maps will show you how much storage the map will occupy. Keep it small by focusing on specific areas.
- 🔄 Keep Maps Updated: Use the auto-update feature in your settings to refresh your saved maps regularly, ensuring you always have the most current information.
- ⚠️ Limitations: Offline Maps doesn’t support live traffic updates or public transport schedules, so plan ahead for these gaps.
6. Keep Track of Your Travels Like a Pro with Google Timeline
Ever tried to find that amazing spot you visited but can’t remember its name? Or had a friend ask for your itinerary, and you drew a blank? That’s where Google Timeline comes to the rescue — it’s like your personal travel journal, automatically keeping track of everywhere you’ve been. 📍✨
One of the hidden gems of Google Maps, Google Timeline helps you look back at your journeys, revisit the places you’ve explored, and even track your daily commutes. For travelers, it’s like a digital scrapbook — one that effortlessly organizes your trips. 🗺️📚
Imagine having a visual diary of your travels, complete with routes, dates, and locations. Whether you want to reminisce about adventures, keep track of where you’ve been, or plan a return trip, Google Timeline is your go-to feature. Plus, it’s perfect for sharing your travel history with friends or revisiting specific places you’ve loved! 🌍💬
How to Use Google Timeline 🗺️📍
- 📱 Open the Google Maps app on your phone.
- 👤 Tap your profile picture in the top-right corner.
- 🧩 Select “Your Timeline” from the dropdown menu.
- 📅 Choose a specific day, month, or year to view your activities during that period.
- 🔍 Tap on a location or route to get detailed insights, such as the mode of transport you used, the time you spent at a place, or photos you took there (if linked to Google Photos).
7. Save More, Drive Smarter: Google Maps’ Fuel-Efficient Routing
Yes, there’s a Google Maps feature that can save you money while reducing your environmental impact — Fuel-Efficient Routes. 🌱⛽ This clever tool calculates the most efficient path based on your vehicle type, road conditions, and traffic, giving you the best route to save fuel, time, and stress.
Whether you’re driving a petrol or diesel car, a hybrid, an electric vehicle, or a motorcycle, this feature optimizes your trip for fuel or energy savings. 🚗🔋 And don’t worry — it still considers real-time traffic and road simplicity to keep your drive smooth!
How to Use It 🚗🌱
- Enable Fuel-Efficient Routes:
- 📱 Open the Google Maps app.
- 👤 Tap your profile picture or initials.
- ⚙️ Go to Settings > Navigation > Route Options and turn on “Prefer fuel-efficient routes.”
- Set Your Vehicle Type:
- ⚙️ Navigate to Settings > Your Vehicle and choose:
- ⛽ Petrol/Diesel: For most standard cars.
- 🔋 Hybrid/Electric: Great for urban traffic.
- 🏍️ Motorcycle: Defaults to petrol engine types.
- Compare Routes:
- 🍃 When entering your destination, check for the green leaf icon — it marks the most efficient route.
- 📊 Google Maps also shows the difference in fuel or energy savings between options if travel time varies significantly.
Final Thoughts
Google Maps has become more than just a navigation app — it’s a comprehensive tool designed to make your travels smarter, easier, and more enjoyable. From immersive views to fuel-efficient routes, each feature is crafted to simplify your journey and help you make the most out of every trip. 🚀
But what’s truly exciting is that Google isn’t stopping here. They’re constantly rolling out new updates and features, making Maps even more powerful for travelers. Whether it’s better indoor navigation, more immersive city views, or innovative tools we haven’t even imagined yet — there’s always something new on the horizon. 🌍✨
As these updates come, I’ll be sharing them right here on my website, along with tips and insights to help you make the most of them. So, stay tuned, explore boldly, and let Google Maps be your trusted travel companion. Safe travels! 🧳✈️